(Hey! Some links in this post may be affiliate links — meaning I may earn a small commission if you buy through them, at no extra cost to you. As an Amazon Associate, I earn from qualifying purchases. I only share products I genuinely love and think you’ll find useful too. Read the full disclosure here).
Hey there, dessert lovers! I’m super excited to share this amazing treat with you. It’s not just any dessert. It’s a creamy, dreamy delight that combines comfort with nutrition.
You’ll love the familiar flavors of sweet bananas and velvety texture. And the best part? This healthy banana pudding is good for you too. No more choosing between taste and health!
I’ve worked hard to make this protein dessert recipe perfect. It’s great for post-workout treats, guilt-free desserts, or any special occasion. And it’s nutritious too!
The best part? It’s really simple to make. Your family will be amazed it’s packed with protein. Let’s start this delicious journey together!
Contents
- 1 Why This Protein Banana Pudding Recipe Changes Everything
- 2 Gathering Your Ingredients for Success
- 3 Essential Equipment and Kitchen Setup
- 4 Preparing Your Ingredients Step by Step
- 5 Creating Your Protein Banana Pudding: Complete Method
- 6 Mastering the Perfect Creamy Consistency
- 7 Customizing Your Recipe with Delicious Variations
- 8 Understanding the Nutritional Powerhouse
- 9 Proper Storage and Serving Guidelines
- 10 Fixing Common Problems Like a Pro
- 11 Conclusion
Why This Protein Banana Pudding Recipe Changes Everything
I’m super excited to share why this nutritious banana dessert is a game-changer! Traditional banana pudding is tasty, but it’s loaded with sugar. This protein version is a total game-changer!
This pudding gives you a big protein boost for muscle recovery and keeps you full for hours. It turns classic comfort food into something that actually helps your body. The protein makes it creamy and thick, without any fake thickeners.
This high protein pudding means you don’t have to choose between taste and health. You can enjoy it without feeling guilty. It’s great for breakfast or as a healthy dessert option that doesn’t feel like a diet.
The best part is how versatile it is! It’s perfect for anyone trying to meet protein goals, looking for a post-workout snack, or just wanting a healthy dessert. It’s comfort food that loves you back!
Unlike regular pudding that makes you crash, this high protein pudding gives you lasting energy and satisfaction. The bananas add natural sweetness, so you need less sugar. Plus, the protein keeps your blood sugar stable. It’s creamy, delicious, and actually good for you!
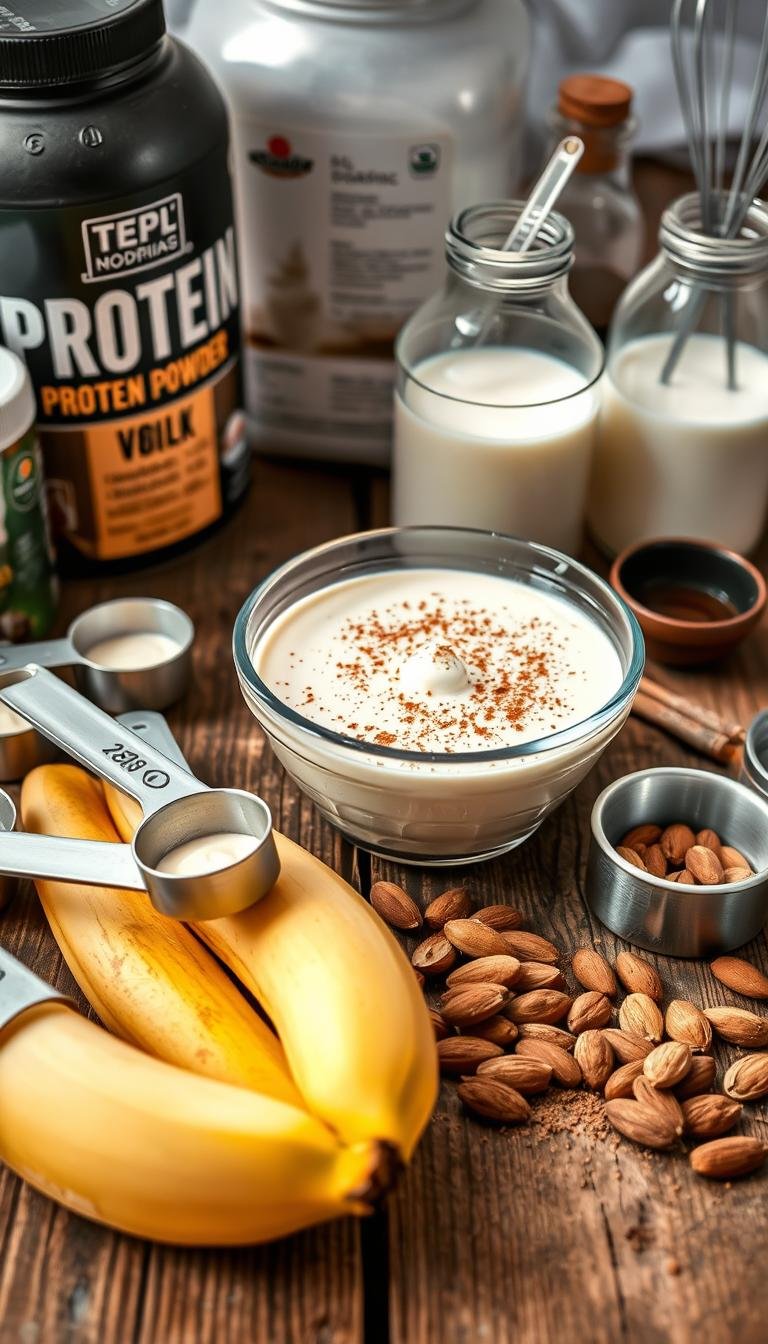
Gathering Your Ingredients for Success
Let’s explore the key ingredients for a top-notch banana protein recipe. This homemade protein pudding is simple to make. You likely have most of these items in your kitchen already.
Quality ingredients are essential for a creamy, tasty treat. I’m excited to guide you through each component. I’ll also share tips for picking the best options!
Choosing the Right Protein Powder
Your choice of protein powder is critical. Opt for vanilla or unflavored whey for the smoothest pudding. These flavors complement the banana without overpowering it.
Plant-based proteins like pea, hemp, and rice also work great. Just remember, some might need extra blending due to their grittier texture.
Steer clear of chocolate protein powder. It can make the pudding too thick and hide the banana’s natural taste.
Selecting Perfect Bananas
The key to great flavor is using bananas that are just right. Look for yellow bananas with a few small brown spots. Avoid green or overly brown bananas.
Green bananas will make your pudding starchy and tasteless. Overripe bananas can make it too sweet and mushy. The perfect banana is sweet and creamy.
I buy bananas a day or two early to let them ripen. This ensures they’re ready when I’m ready to make my banana protein recipe!
Essential Base Ingredients
The base ingredients are simple pantry staples. Greek yogurt adds creaminess and boosts protein. Use plain, unsweetened yogurt for the best flavor.
For sweetness, I prefer honey or maple syrup. Start with a tablespoon and add more if needed. Pure vanilla extract adds a classic flavor, while a pinch of salt enhances it.
Lastly, a splash of milk is needed for the right consistency. Use dairy, almond, or oat milk in your homemade protein pudding.
| Ingredient Category | Best Options | Amount Needed | Key Benefits |
|---|---|---|---|
| Protein Powder | Vanilla or unflavored whey | 1-2 scoops | Smooth texture, neutral flavor |
| Bananas | Yellow with few brown spots | 2 medium bananas | Natural sweetness, creamy base |
| Greek Yogurt | Plain, unsweetened | 1/2 cup | Extra protein, rich texture |
| Sweetener | Honey or maple syrup | 1-2 tablespoons | Natural sweetness, flavor depth |
Essential Equipment and Kitchen Setup
Let’s turn your kitchen into a pudding paradise with just a few tools! I love how simple and accessible this protein banana pudding recipe is. You don’t need fancy gadgets or complicated machines to make it.
Your kitchen likely has most of what you need. This recipe is all about simplicity yet delivers amazing results!
Required Tools and Appliances
Your protein pudding equipment list is short and sweet! A good blender or food processor is key. It’s crucial for that silky-smooth texture we all love.
Here’s what you’ll need for success:
- High-speed blender or food processor – Your texture game-changer!
- Medium and large mixing bowls
- Measuring cups and spoons (both dry and liquid)
- Rubber spatula for gentle folding and scraping
- Serving glasses or dessert bowls
- Fine-mesh strainer (optional but helpful)
An immersion blender is also great for smaller batches. The main thing is to have something that blends ingredients smoothly.
The secret to perfect pudding isn’t fancy equipment – it’s using the right tools with confidence and care.
Prep Work Organization
Smart kitchen setup makes this recipe a breeze! I always say five minutes of organization saves twenty minutes of stress during cooking.
Clear a good workspace on your counter. You’ll need room for your blender, mixing bowls, and ingredients. Make sure your blender is clean and dry before starting.
Here’s my favorite prep routine:
- Measure all ingredients and arrange them in order of use
- Chill your serving glasses in the refrigerator
- Set out all your pudding preparation tools within easy reach
- Have a clean kitchen towel ready for quick cleanups
Pro tip: Chill your serving glasses beforehand. Cold pudding in cold glasses is pure perfection! It keeps everything at the ideal temperature and makes the final presentation look professional.
The whole setup process takes maybe five minutes. It makes your cooking experience calm, organized, and enjoyable. Trust me, this little bit of preparation makes all the difference between a stressful cooking session and a fun one!
Preparing Your Ingredients Step by Step
Perfect protein banana pudding starts with the right ingredient prep. This step is key for smooth, creamy pudding every time. I’ll guide you through each part to avoid mistakes and make pudding perfection.
Spending time on prep makes assembly easy and fun. Each ingredient needs special care for the best taste and texture. Let’s explore the techniques to make your pudding amazing!
Banana Preparation Method
Your banana preparation affects flavor and looks. Choose bananas with a few brown spots but are firm. This ensures they’re ripe but not too soft.
Cut your bananas into even rounds about 1/4 inch thick. This thickness ensures every bite has the right banana-to-pudding mix. Use a sharp knife and a clean cutting board for the best results.
My secret tip: toss sliced bananas with a bit of fresh lemon juice. This stops browning and keeps them looking great, even if you’re not assembling right away. The lemon won’t change the taste but keeps your pudding looking perfect!
Protein Powder Mixing Technique
The protein mixing technique is vital for avoiding lumps. Never add protein powder to a lot of liquid at once. This creates clumps that are hard to get rid of!
Start by whisking your protein powder with 2-3 tablespoons of liquid in a small bowl. Make a smooth paste first, whisking well until it’s lump-free. This paste method is your secret for silky results!
Slowly add the rest of the liquid while whisking constantly. I add it in three stages, whisking well between each addition. This careful approach prevents clumps and makes the base smooth.
Base Layer Preparation
Your pudding base preparation is key to creamy perfection! In a separate bowl, mix your Greek yogurt, sweetener, and vanilla extract. Make sure these ingredients are smooth before adding your protein mixture.
Mix these base ingredients until they’re smooth and well-combined. Taste as you go and adjust sweetness or vanilla to your liking. This is your chance to customize the flavor!
The following table shows the best mixing order and timing for each part:
| Component | Mixing Time | Key Technique | Common Mistake |
|---|---|---|---|
| Protein Paste | 2-3 minutes | Whisk vigorously | Adding liquid too fast |
| Base Mixture | 3-4 minutes | Gentle folding | Over-mixing yogurt |
| Final Combination | 2-3 minutes | Slow incorporation | Rushing the process |
| Banana Integration | 1-2 minutes | Careful layering | Mashing bananas |
Once your base is smooth, you’re ready to mix in your protein. Fold it in gently to keep the texture light and airy. This careful prep is what makes your pudding stand out!
Creating Your Protein Banana Pudding: Complete Method
Get ready to make your masterpiece with the protein pudding method! This method ensures amazing results every time. I’m excited to guide you through each step.
This recipe is simple and quick. You’ll be amazed at how fast it comes together. Let’s get started on turning your ingredients into pudding perfection.
Step 1: Making the Protein Base
Begin by mixing your protein mixture with yogurt in a blender. This is the base of your pudding! Blend for 2-3 minutes until it’s smooth and creamy.
The pudding should be thick but pourable, like rich custard. If it’s too thick, add a bit of milk. If it’s too thin, let it thicken on its own.
Blend well to avoid lumps. When it coats the spoon, it’s ready.
Step 2: Preparing the Banana Layer
Now, add your sliced bananas to the protein base. Fold them gently with a spoon or spatula. Be careful not to mash them.
We want the bananas to stay whole for texture and looks. Fold them gently to keep their shape. This makes your pudding look great.
Step 3: Assembly and Layering Process
The banana pudding assembly is fun and creative! Use clear glasses or a large dish to show off the layers. Glass containers make the stripes stand out.
Start with a layer of pudding, then bananas, then more pudding. This layering technique makes it look stunning.
Keep layering until you reach the top. Finish with a pudding layer for the best look. Don’t worry about perfection – rustic layers are great too!
Step 4: Final Setting and Chilling
Now, the hard part – waiting! Cover your pudding with plastic wrap to prevent skin. Make sure it touches the surface.
The chilling process needs at least 2 hours in the fridge, but overnight is better. This lets the flavors blend and the texture set.
Waiting is worth it! Your patience will be rewarded with a delicious and healthy pudding. It’s so good, everyone will want your secret!
Mastering the Perfect Creamy Consistency
The secret to amazing creamy protein pudding is all about the texture. I’ve found that getting that perfect, smooth feel is all about how you mix it. It’s about knowing how protein powder works and using the right methods.
It’s not just about throwing everything in a blender and hoping for the best. You need to make a smooth pudding texture that feels great on your spoon and is easy to pour. Once you get this right, you’ll never go back to bad pudding again!
Blending Techniques for Smooth Results
The magic happens when you blend! Start on the lowest speed to avoid air bubbles. These bubbles can ruin your pudding, making it foamy.
Slowly increase the speed as things start to mix. Blend for 2-3 minutes, stopping every 30 seconds to scrape down the sides. This makes sure all the protein powder is mixed in well.
When you’re done, the mixture should be smooth and lump-free. If it coats the back of a spoon evenly, you’ve got it right!
Patience is key for perfect texture. Rushing can lead to lumps.
Avoiding Common Texture Mistakes
Let’s avoid common mistakes! The biggest one is adding liquid too fast. This creates lumps that are hard to fix.
Another mistake is blending too much. This can make your creamy protein pudding too thin and watery.
Cold ingredients are bad for smooth pudding texture. Make sure everything is at room temperature before blending. Cold protein and milk don’t mix well.
If you get lumps, don’t worry! Just strain the mixture or add a bit more liquid and blend again. It should be smooth but pourable.
Remember, your pudding will thicken in the fridge. If it’s a bit thin at first, that’s okay. Just trust the process and you’ll get it right!
Customizing Your Recipe with Delicious Variations
This base recipe opens up a world of delicious variations that will keep your family excited for dessert! I absolutely love how versatile this protein pudding becomes when you start experimenting with different flavors and ingredients. Each variation brings its own special character and nutritional benefits.
The beauty of these customizations is that they’re incredibly simple to make. You can transform your basic recipe into gourmet treats with just a few ingredient swaps or additions!
Chocolate Protein Version
Creating a rich chocolate protein pudding is as easy as making one simple swap! Replace your vanilla protein powder with chocolate protein powder, or add 2-3 tablespoons of unsweetened cocoa powder to your vanilla base.
This chocolate version tastes like dessert heaven while packing the same protein punch. The cocoa adds antioxidants and creates that deep, satisfying chocolate flavor we all crave. I recommend using high-quality cocoa powder for the best results!
For extra richness, try adding a tablespoon of sugar-free chocolate syrup or a handful of mini dark chocolate chips. Your chocolate protein pudding will rival any traditional dessert!
Peanut Butter Banana Combination
The classic pairing of peanut butter and banana creates pure magic in pudding form! Add 2-3 tablespoons of natural peanut butter to your base mixture for this incredible peanut butter banana pudding.
This combination provides healthy fats and extra protein while delivering that nostalgic flavor everyone loves. Make sure to use natural peanut butter without added sugars for the healthiest option.
I love garnishing this peanut butter banana pudding with chopped peanuts or a drizzle of melted peanut butter on top. It’s like having a peanut butter banana smoothie in pudding form!
Berry and Vanilla Enhancements
Fresh berries transform your pudding into a vibrant berry protein dessert that’s both beautiful and nutritious! Fold in fresh strawberries, blueberries, or raspberries along with your bananas for amazing color and flavor.
You can also swirl in sugar-free berry jam for gorgeous marbled effects. The antioxidants from berries boost the nutritional value while adding natural sweetness and tartness.
For a tropical twist on your berry protein dessert, try adding coconut protein powder with diced mango or pineapple. The possibilities are truly endless!
| Variation | Key Ingredients | Flavor Profile | Nutritional Boost |
|---|---|---|---|
| Chocolate Protein Pudding | Cocoa powder or chocolate protein | Rich, decadent chocolate | Antioxidants from cocoa |
| Peanut Butter Banana Pudding | Natural peanut butter | Creamy, nutty sweetness | Healthy fats and extra protein |
| Berry Protein Dessert | Fresh berries or sugar-free jam | Bright, fruity tartness | Vitamin C and antioxidants |
| Tropical Version | Coconut protein, mango, pineapple | Exotic, refreshing sweetness | Tropical vitamins and minerals |
Each variation maintains the same basic preparation method while providing different taste experiences. I encourage you to experiment and find your family’s favorite combination!
Remember that these customizations don’t just change the flavor – they also modify the nutritional profile. Berry additions provide vitamin C and fiber, while peanut butter adds healthy monounsaturated fats.
Understanding the Nutritional Powerhouse
This protein pudding nutrition profile is a game-changer. It’s not just a sweet treat. It’s a nutritional powerhouse that offers amazing health benefits with every bite.
This recipe turns dessert time into fuel time for your body. It’s a huge leap from store-bought pudding, like a sports car compared to a bicycle!
Protein Content Breakdown
Each serving of this high protein dessert has 20-25 grams of high-quality protein. That’s more than three eggs or a small chicken breast.
Your protein powder is the main source of this muscle-building protein. You can choose whey, casein, or plant-based options. They all provide complete amino acids for muscle recovery and growth.
The Greek yogurt adds 6-8 grams of protein per serving. It’s slow-digesting casein that keeps you full for hours. Plus, you get beneficial probiotics for your gut!
Traditional pudding has only 2-3 grams of protein. This recipe offers 8-10 times more muscle-building nutrition in every bite!
Health Benefits Over Traditional Pudding
The healthy pudding benefits of this recipe go beyond protein. Bananas add potassium for heart health, vitamin B6 for brain function, and natural fiber for digestion.
Traditional pudding uses refined sugars that lead to energy crashes and cravings. This recipe uses natural banana sweetness and stevia for sustained energy without sugar spikes!
“This dessert can fit into various eating plans, whether you’re focused on fitness goals, weight management, or just wanting to make healthier choices for your family.”
Kids can enjoy this as an after-school snack and get nutrition that supports their growth. You’re giving them sustained energy instead of empty calories!
The fiber content keeps you full longer, while the protein supports muscle maintenance and metabolism. It shows that healthy eating can be delicious and satisfying!
This protein pudding nutrition profile is great for post-workout recovery, healthy breakfast options, or guilt-free evening treats. Your body gets everything it needs to thrive!
Proper Storage and Serving Guidelines
Enjoying your protein banana pudding at its best is all about pudding storage. I’ve found that how you store it makes a huge difference. It keeps the creamy texture and fresh banana flavor just right!
Here are my top refrigeration tips for keeping your pudding fresh and delicious. The goal is to prevent that unwanted skin from forming while keeping everything tasty.
Refrigeration Best Practices
Always keep your protein banana pudding covered in the fridge. This is a must! Use plastic wrap directly on the pudding to block air. This step stops that rubbery skin from appearing.
Next, cover it with a tight-fitting lid for extra safety. With these pudding storage methods, your pudding stays fresh for 3-4 days. But, it usually gets eaten up quickly because everyone loves it so much!
Keeping the temperature steady is key for the best results. Store your pudding in the main fridge area, not in the door where temperatures change. A consistent 35-38°F ensures perfect texture every time.
Make-Ahead Tips and Timing
This make-ahead dessert actually gets better with time! The flavors blend beautifully, making it even more delicious. I love making it the night before for gatherings or meal prep.
Prepare individual portions in mason jars or small containers for easy grab-and-go. This is great for busy days and helps with portion control!
For special events, prepare your make-ahead dessert at least 4 hours ahead, but overnight is best. You can make it in the morning for evening dessert or on Sunday for weekday treats.
| Timing | Best Use | Texture Quality | Flavor Development |
|---|---|---|---|
| 2-4 hours | Same day serving | Good | Fresh and light |
| Overnight | Next day events | Excellent | Fully developed |
| 2-3 days | Meal prep portions | Very good | Rich and creamy |
| 4 days maximum | Extended storage | Good with stirring | Intense banana flavor |
Before serving, gently stir if it has separated slightly. This is normal! Take it out of the fridge about 10 minutes before serving for the perfect temperature. These simple refrigeration tips will make every spoonful perfect.
The best desserts are those that taste even better the next day, and this protein banana pudding is proof that patience pays off in the kitchen.
Fixing Common Problems Like a Pro
Don’t worry – I’ve got your back if anything goes sideways with your protein banana pudding! Even experienced cooks run into little hiccups sometimes. I want you to feel confident handling any pudding troubleshooting that might come up.
The good news is that most issues are super easy to fix! With a few simple tricks, you’ll turn any pudding mishap into a delicious success story.
Solving Texture Issues
Let’s tackle those pesky texture problems head-on! If your pudding turns out too thick, simply whisk in a tablespoon of milk at a time until you reach the perfect consistency. Too thin? Add a bit more Greek yogurt or let it chill longer to naturally thicken.
Lumpy texture usually means the protein powder wasn’t mixed properly. Strain it through a fine-mesh sieve or give it another good blend with a splash of liquid. Slow and steady mixing prevents most texture problems from happening in the first place!

Adjusting Flavor and Sweetness
Taste as you go – that’s my golden rule for perfect flavor adjustment! Not sweet enough? Add a drizzle more honey or maple syrup. Want more vanilla? A few extra drops will do the trick.
If it tastes too “protein-y,” add a pinch of salt and a bit more sweetener to balance it out. The salt actually enhances the natural banana flavor while taming any chalky protein taste. Trust me on this one!
Preventing Separation and Curdling
Separation can happen if ingredients are too cold when mixed. Let everything come to room temperature first, and always blend thoroughly. This simple step prevents most separation issues!
If curdling occurs (rare, but possible), it’s usually from adding acidic ingredients too quickly. Take your time and add them gradually while whisking constantly.
| Problem | Quick Fix | Prevention Tip |
|---|---|---|
| Too Thick | Add milk 1 tablespoon at a time | Use room temperature ingredients |
| Too Thin | Add Greek yogurt or chill longer | Measure protein powder accurately |
| Lumpy Texture | Strain through fine-mesh sieve | Blend protein powder with liquid first |
| Not Sweet Enough | Add honey or maple syrup gradually | Taste test during mixing process |
| Separation | Re-blend with splash of milk | Use room temperature ingredients |
Remember, cooking is all about adjusting and tasting – you’ve got this! Every pudding troubleshooting experience makes you a better cook. Don’t be afraid to experiment and make it your own!
Conclusion
You’ve found the secret to making healthy desserts that taste amazing! This protein banana pudding recipe shows you can enjoy nutritious treats. It’s exciting to think about how this homemade pudding will satisfy your sweet tooth and support your health goals.
Your kitchen is ready to make this creamy, protein-rich dessert. You know how to pick the best bananas and get that smooth texture. Now, you can make this recipe a hit every time.
This isn’t just any dessert. It’s perfect for after workouts, family events, or when you want something sweet. The best part is, it’s both delicious and good for you. This pudding is versatile and lets you serve something tasty and healthy.
This recipe is a perfect mix of indulgence and nutrition. You’ll enjoy the rich taste and feel good about what you’re eating. It’s a win-win for your taste buds and your health.
Now, it’s time to start making healthier desserts! Get those ripe bananas and your favorite protein powder ready. It’s time to make something incredible that everyone will love – and ask for more of!