(Hey! Some links in this post may be affiliate links — meaning I may earn a small commission if you buy through them, at no extra cost to you. As an Amazon Associate, I earn from qualifying purchases. I only share products I genuinely love and think you’ll find useful too. Read the full disclosure here).
Welcome to the amazing world of Mediterranean flavors! I’m so excited to share this authentic Middle Eastern appetizer that will absolutely wow your guests at any gathering.
This creamy, smoky roasted eggplant dip brings the perfect blend of rich textures and bold tastes. The secret lies in perfectly charred eggplant that creates that signature smoky flavor everyone loves.
What makes this dish truly special? It’s incredibly healthy and packed with nutrients. Plus, it tastes so much better than store-bought versions!
We’ll walk through every step together – from selecting the best eggplant to making those irresistible homemade pita chips. Trust me, once you master this technique, you’ll become the star of every party!
The best part? This Mediterranean classic is surprisingly easy to make. Let’s dive into this delicious culinary adventure!
Contents
- 1 Understanding Baba Ganoush: Origins and Characteristics
- 2 Essential Ingredients for Perfect Baba Ganoush
- 3 Kitchen Equipment and Tools You’ll Need
- 4 Preparing and Roasting Eggplant to Perfection
- 5 Step-by-Step Baba Ganoush Recipe Instructions
- 6 Homemade Pita Chips: Crispy Perfect Accompaniment
- 7 Serving Suggestions and Presentation Ideas
- 8 Storage Methods and Recipe Variations
- 9 Troubleshooting Common Baba Ganoush Problems
- 10 Conclusion
Key Takeaways
- Roasting eggplant properly creates the signature smoky flavor
- Homemade pita chips pair perfectly with this creamy dip
- This healthy appetizer impresses guests at any gathering
- Store-bought versions can’t match the fresh, authentic taste
- Simple ingredients create complex, Mediterranean flavors
- Perfect make-ahead option for entertaining
Understanding Baba Ganoush: Origins and Characteristics
Understanding the rich heritage of authentic baba ganoush opens up a world of culinary tradition and flavor. This beloved dip represents centuries of cooking wisdom passed down through generations! When you dive into its history and characteristics, you’ll discover why this creamy, smoky creation has become such a treasured part of Mediterranean and Middle Eastern tables.
Historical Background of This Middle Eastern Staple
Baba ganoush has deep roots in the Levantine region, where it first appeared centuries ago. The name literally translates to “pampered papa” – isn’t that just adorable? This Middle Eastern cuisine staple spread throughout the Ottoman Empire and beyond.
Traditional recipes were carefully guarded family secrets. Each region developed its own special touches and techniques. From Lebanon to Syria, from Turkey to Palestine, every culture added their unique spin to this incredible dip!
What Makes Authentic Baba Ganoush Special
What sets authentic baba ganoush apart from store-bought versions? It’s all about that perfect balance of flavors and textures! The secret lies in properly charring the eggplant to achieve that distinctive smoky taste.
Real baba ganoush features a symphony of ingredients working together. Creamy tahini provides richness, while fresh lemon juice adds brightness. Aromatic garlic brings depth, and quality olive oil ties everything together beautifully.
Unlike processed versions, homemade baba ganoush has incredible depth of flavor. You can actually taste each component while they blend harmoniously. That’s the magic of traditional preparation methods!
Nutritional Benefits and Health Advantages
This Mediterranean dip isn’t just delicious – it’s incredibly nutritious too! Eggplant provides powerful antioxidants that support your health. It’s also packed with fiber and potassium for heart health.
Tahini contributes healthy fats and plant-based protein. These nutrients help keep you satisfied and energized. Plus, the sesame seeds in tahini provide important minerals like calcium and magnesium.
Here’s the best part – baba ganoush is naturally vegan and gluten-free! It fits perfectly into almost any dietary lifestyle. You can enjoy this creamy, satisfying dip without any guilt whatsoever.
The combination of ingredients creates a nutritional powerhouse. Healthy fats, protein, fiber, and antioxidants all work together to support your wellbeing. Now that’s what I call a smart snacking choice!
Essential Ingredients for Perfect Baba Ganoush
Quality ingredients are the secret weapon that transforms ordinary baba ganoush into something truly extraordinary! I’m so excited to walk you through each component because getting these basics right makes all the difference in your final dish. When you invest in premium ingredients, you’re setting yourself up for baba ganoush success that’ll have everyone asking for your recipe!
The beauty of this Middle Eastern favorite lies in its simplicity. With just a handful of carefully chosen ingredients, you can create something that tastes like it came straight from a Mediterranean kitchen. Let me share my tried-and-true approach to selecting each component!
Selecting the Right Eggplant Varieties
Choosing the perfect eggplant is absolutely crucial for authentic baba ganoush! I always reach for medium to large globe eggplants because they have the ideal flesh-to-seed ratio. These eggplant varieties should feel heavy for their size – that’s your sign they’re packed with moisture and flavor.
Look for eggplants with smooth, glossy skin that’s free from soft spots or wrinkles. The skin should have a deep purple color with no brown patches. When you gently press the eggplant, it should spring back – this tells you it’s fresh and ready for roasting!
I avoid the long, thin Japanese eggplants for baba ganoush because they can be too watery. Stick with the classic globe varieties, and you’ll get that perfect creamy texture we’re after.
Quality Tahini and Its Impact on Flavor
Here’s where I get really passionate – your tahini sauce makes or breaks your baba ganoush! Please don’t skimp on this ingredient because it’s truly the heart of the dish. High-quality, pure sesame seed paste delivers that rich, nutty flavor that makes baba ganoush so irresistible.
I personally recommend brands like Joyva or Soom because they consistently deliver exceptional taste. These brands use only sesame seeds without any additives or preservatives. The tahini should be smooth and creamy, not grainy or separated.
When you open a new jar of tahini, you might notice oil separation on top – that’s completely normal! Just stir it well before using. Good tahini has a rich, toasted sesame aroma that makes your mouth water just thinking about it.
Fresh Garlic, Lemon Juice, and Seasoning Components
Fresh garlic is absolutely non-negotiable in authentic baba ganoush! I never use garlic powder because it lacks the sharp, pungent bite that fresh cloves provide. You’ll want to use 2-3 medium cloves, depending on how garlicky you like your dip.
For lemon juice, always squeeze it fresh – never use the bottled stuff! Fresh lemon juice has that bright, acidic punch that balances the rich tahini and smoky eggplant perfectly. I usually need about 2-3 tablespoons, but taste as you go.
Quality sea salt makes a huge difference too! I prefer coarse sea salt because it dissolves beautifully and adds just the right mineral notes. A pinch of ground cumin brings warmth and depth that really makes the flavors sing together.
| Ingredient | Quality Indicators | Amount Needed | Flavor Impact |
|---|---|---|---|
| Fresh Garlic | Firm cloves, no green sprouts | 2-3 medium cloves | Sharp, pungent bite |
| Lemon Juice | Freshly squeezed, bright color | 2-3 tablespoons | Bright acidity, balance |
| Sea Salt | Coarse crystals, pure white | 1-2 teaspoons | Mineral depth, enhancement |
| Ground Cumin | Aromatic, recently ground | 1/2 teaspoon | Warm, earthy notes |
Optional Ingredients for Flavor Enhancement
Now here’s where we can get creative and make your baba ganoush absolutely unforgettable! These optional ingredients aren’t traditional, but they add incredible depth and complexity that’ll have your guests raving.
Pomegranate molasses is my secret weapon for adding gorgeous tang and a hint of sweetness. Just a drizzle transforms the entire flavor profile! You can find this Middle Eastern staple at most grocery stores now, and it keeps forever in your pantry.
Fresh parsley brings beautiful color and a clean, herbaceous note that brightens everything up. I like to reserve some for garnish too – it makes the presentation so much more appealing!
Sumac is another authentic Middle Eastern ingredient that adds a lovely tartness and beautiful red color. It’s becoming easier to find in regular supermarkets, and it gives your baba ganoush that restaurant-quality finish.
Some people love adding a touch of olive oil right into the mixture for extra richness. I prefer to drizzle it on top for serving, but feel free to experiment and find what works for your taste preferences!
Kitchen Equipment and Tools You’ll Need
Let me walk you through the essential kitchen equipment that will help you create the smoothest, most delicious baba ganoush! The best part? You probably already have most of these tools sitting in your kitchen right now.
Making restaurant-quality baba ganoush doesn’t require fancy gadgets or expensive appliances. With just a few basic tools, you’ll be whipping up this creamy Mediterranean dip like a pro!
Essential Cooking Equipment for Roasting
Your roasting tools are the foundation of great baba ganoush! A rimmed baking sheet is my personal favorite method – it’s reliable and gives you consistent results every time.
For that extra smoky flavor, you can also use your gas burner or outdoor grill. Both methods work beautifully and add that authentic charred taste that makes baba ganoush so special.
Don’t forget these roasting essentials:
- Sharp knife for scoring eggplant
- Cutting board for prep work
- Fork for testing doneness
- Tongs for safe handling
Food Processing and Mixing Tools
Here’s where the magic happens! A food processor is absolutely your best friend for achieving that perfectly smooth, creamy texture we’re after.
If you don’t have a food processor, don’t panic! You have other options that work great too. A potato masher will give you a more rustic, chunky texture that’s equally delicious.
Your mixing arsenal should include:
- Large mixing bowl for combining ingredients
- Measuring cups and spoons for accuracy
- Rubber spatula for scraping sides clean
- Wooden spoon for gentle stirring
Serving and Storage Containers
Presentation matters! Choose a beautiful shallow bowl or platter that shows off your gorgeous creation. The right serving dish makes your baba ganoush look as amazing as it tastes.
For storage, airtight containers are essential. This dip actually gets better after sitting in the fridge overnight, so proper storage keeps it fresh and flavorful!
| Tool Category | Essential Items | Alternative Options | Purpose |
|---|---|---|---|
| Roasting | Rimmed baking sheet | Gas burner, grill | Cook eggplant perfectly |
| Processing | Food processor | Potato masher, fork | Create smooth texture |
| Mixing | Large bowl, spatula | Multiple smaller bowls | Combine ingredients |
| Serving | Shallow serving bowl | Regular dinner plates | Beautiful presentation |
Remember, the most important kitchen equipment you have is your enthusiasm! With these basic tools and a little love, you’ll create baba ganoush that rivals any restaurant.
Preparing and Roasting Eggplant to Perfection
Roasting eggplant to perfection is where the magic truly begins in baba ganoush making! This crucial step transforms ordinary eggplant into the smoky, creamy base that makes authentic baba ganoush so irresistible. I’m excited to walk you through every detail to ensure your roasted eggplant turns out absolutely perfect every single time.
Selecting and Preparing Fresh Eggplant
Choosing the right eggplant makes all the difference in your final dish! Look for medium to large eggplants that feel heavy for their size and have smooth, glossy skin without soft spots or wrinkles. The stem should look fresh and green – that’s your sign of peak freshness!
Before roasting, give your eggplant a good wash and pat it completely dry. Here’s the essential prep step: pierce the eggplant all over with a fork about 10-12 times. This prevents any explosive surprises in your oven and helps the heat penetrate evenly throughout the flesh.
Roasting Techniques: Oven vs. Open Flame Methods
Oven roasting is my go-to method for consistent, reliable results every time! Preheat your oven to 425°F and place the pierced eggplant directly on the middle rack. Roast for 45-60 minutes until the skin looks charred and wrinkled, and the flesh feels completely soft when gently pressed.
For those feeling adventurous, flame roasting delivers incredible smoky depth! Char the eggplant directly over a gas burner or grill, turning frequently with tongs. This method takes about 15-20 minutes of constant attention, but the results are phenomenal.
| Method | Time Required | Flavor Profile | Difficulty Level |
|---|---|---|---|
| Oven Roasting | 45-60 minutes | Mild smokiness | Beginner-friendly |
| Flame Roasting | 15-20 minutes | Intense smoky flavor | Intermediate |
| Grill Roasting | 25-35 minutes | Balanced smokiness | Moderate |
Achieving the Perfect Smoky Flavor
The secret to amazing smoky flavor is really letting that skin char without worrying about appearances! Your eggplant should look pretty rough on the outside – wrinkled, deflated, and darkly charred. Don’t panic when it looks ugly – that’s exactly what we want!
For maximum smokiness, let the skin blacken completely during flame roasting. The more charred the exterior, the more incredible smoky flavor infuses into the tender flesh inside. Trust the process!
Cooling and Flesh Extraction Process
Patience is key here, even though I know you’re excited to dig in! Let your roasted eggplant cool completely before handling – this usually takes about 15-20 minutes. The flesh continues cooking from residual heat during this time.
Once cooled, slice the eggplant open lengthwise with a sharp knife. Use a spoon to gently scoop out all the tender, smoky flesh, leaving behind the charred skin completely. The flesh should be silky and almost custard-like in texture – that’s your sign of perfectly roasted eggplant!
Step-by-Step Baba Ganoush Recipe Instructions
The magic happens when all your beautiful ingredients come together in perfect harmony! Following the right baba ganoush instructions makes all the difference between good and absolutely incredible results. I’m so excited to walk you through my foolproof method that creates the most amazing dip every single time.
Combining Base Ingredients in Proper Order
Here’s where the recipe steps really matter – order is everything! Start by adding your cooled roasted eggplant flesh to the food processor first. This creates the perfect base for everything else.
Next, add your aromatics: 2 cloves of minced garlic for that wonderful bite. Then comes 1/4 cup of quality tahini – this adds the nutty richness we’re after. Squeeze in the juice of 1 large lemon for brightness, and finish with 1 teaspoon of salt to bring all the flavors together.
Pro tip: Adding ingredients in this specific order helps create the smoothest texture possible!
Blending Techniques for Ideal Texture
Now for the fun part – transforming these ingredients into creamy perfection! Start by pulsing the mixture a few times to break everything down initially. This prevents the motor from working too hard.
Process continuously for about 2-3 minutes until the mixture becomes smooth and creamy. Here’s my secret: scrape down the sides of the bowl every minute or so to ensure even blending throughout.
The perfect texture should be smooth but not completely pureed. We want some subtle texture that shows this is beautifully homemade, not store-bought!
Seasoning and Taste Adjustment Methods
Time for my favorite part – the taste test! This is where your baba ganoush truly becomes yours. Start with small adjustments and taste as you go.
Need more tang? Add lemon juice bit by bit until it’s perfect. Want more nuttiness? A touch more tahini works wonders. If the mixture seems too thick, add a tablespoon of water or olive oil to loosen it up beautifully.
Remember: Season gradually – you can always add more, but you can’t take it away!
Final Consistency and Presentation Tips
Your finished baba ganoush should have the perfect consistency – creamy and spreadable but not runny. Think somewhere between hummus and thick Greek yogurt. That’s the sweet spot!
Transfer your creation to a serving bowl and create a shallow well in the center using the back of a spoon. This beautiful indentation is where you’ll add gorgeous garnishes like olive oil, fresh herbs, or pine nuts.
The final result should look restaurant-quality and taste absolutely incredible. You’ve just created authentic Middle Eastern magic in your own kitchen!
Homemade Pita Chips: Crispy Perfect Accompaniment
Let’s create some absolutely irresistible homemade pita chips that will elevate your baba ganoush experience! These golden, crunchy delights are so much better than store-bought versions. You’ll have complete control over the flavor and texture.
The secret to perfect crispy pita chips lies in choosing quality ingredients and using the right techniques. I promise you’ll never go back to buying them once you master this simple process!
Choosing the Right Pita Bread
The foundation of great chips starts with selecting the perfect pita bread. I always recommend whole wheat pita pockets because they have ideal thickness and durability. They hold up beautifully when you dip them into that creamy baba ganoush!
Day-old pita actually works even better than fresh bread. It crisps up more evenly and won’t get soggy as quickly. Look for pockets that feel slightly firm to the touch.
Avoid pita that’s too thin or has tears in it. You want sturdy bread that can handle generous scoops of your delicious dip!
Cutting and Seasoning Techniques
Here’s my tried-and-true method for preparing your pita. Split each pocket into two separate rounds by gently pulling them apart. Then cut each round into 6-8 triangular wedges using kitchen shears – they’re so much easier than a knife!
Arrange the triangles in a single layer on a large baking sheet. Brush lightly with olive oil to ensure even browning. Sprinkle with a pinch of sea salt for that perfect savory flavor.
For extra pizzazz, try adding za’atar, garlic powder, or dried herbs. These seasonings transform simple chips into gourmet treats that’ll impress your guests!
Baking Methods for Maximum Crispiness
The key to perfect crispy pita chips is using the right baking methods. Preheat your oven to 400°F for optimal results. This temperature creates that golden-brown color without burning.
Bake for 8-10 minutes until the chips turn beautifully golden. Keep a close eye on them because they can go from perfect to burnt very quickly! You’ll hear them getting crispy as they bake.
Let them cool completely on the baking sheet. They’ll continue crisping up as they cool down, giving you that satisfying crunch we all love.
Alternative Cooking Methods and Variations
If you’re in a hurry, try pan-frying your chips! Heat a little oil in a large skillet over medium heat. Cook the triangles for 2-3 minutes per side until golden brown.
For a healthier option, use an air fryer at 375°F for 3-4 minutes. This method gives you perfectly crispy pita with less oil.
You can also experiment with different flavors. Try sprinkling parmesan cheese, everything bagel seasoning, or even a touch of smoked paprika. Each variation pairs wonderfully with your homemade baba ganoush!
Serving Suggestions and Presentation Ideas
Presentation transforms your homemade baba ganoush from simple dip to stunning centerpiece! The way you serve this creamy Mediterranean delight can make all the difference between a casual snack and an impressive culinary experience. I love how a few thoughtful touches turn your kitchen creation into something that looks like it came straight from a fancy restaurant.
Let me share my favorite serving suggestions that never fail to wow guests. The secret lies in understanding both traditional techniques and modern presentation styles that work perfectly for today’s entertaining needs.
Traditional Middle Eastern Presentation Style
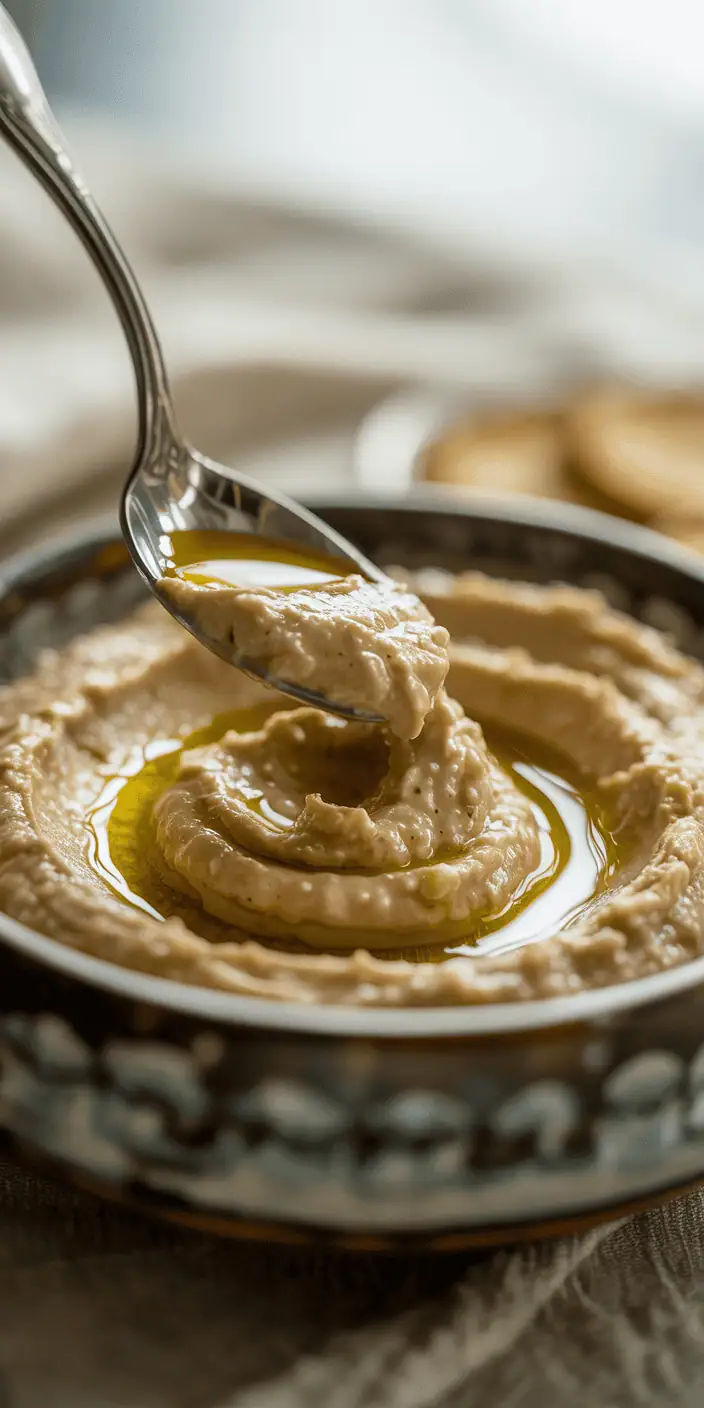
The authentic Middle Eastern approach is absolutely gorgeous and surprisingly simple! Start by spreading your baba ganoush in a shallow, wide serving bowl – this creates the perfect canvas for decoration. Use the back of a spoon to create a gentle well in the center.
Drizzle your finest extra virgin olive oil into that center well and watch it pool beautifully. The contrast between the creamy beige dip and golden oil creates an instantly appealing visual. This traditional method has been perfected over generations, and there’s a reason it’s stood the test of time!
Sprinkle fresh chopped parsley around the edges for that pop of green color. Add a light dusting of paprika for warmth and visual appeal. For special occasions, I love adding pomegranate seeds – they provide gorgeous color and a delightful sweet-tart burst that complements the smoky eggplant perfectly.
Garnishing with Olive Oil and Fresh Herbs
Your garnish game can make your party appetizer absolutely Instagram-worthy! Beyond the classic olive oil drizzle, try creating artistic patterns with different herb oils. Blend fresh mint or basil with olive oil for colorful, flavorful drizzles.
Fresh herbs bring life to every serving. Chopped parsley remains the classic choice, but don’t be afraid to experiment! Fresh mint leaves add brightness, while a sprinkle of za’atar provides authentic Middle Eastern flavor. Even a few whole chickpeas scattered around the bowl add textural interest and traditional appeal.
Pairing with Additional Mediterranean Dishes
Creating a stunning mezze spread with Mediterranean dishes turns your baba ganoush into the star of an impressive feast! I always pair it with hummus, tabbouleh, and marinated olives for variety. The different colors and textures create a visually stunning table.
Fresh vegetables make perfect accompaniments and add healthy crunch. Cucumber slices, cherry tomatoes, bell pepper strips, and radishes provide beautiful colors and fresh flavors that complement the rich, smoky dip. Don’t forget those crispy homemade pita chips we made earlier – they’re absolutely essential!
For a more substantial spread, add grilled vegetables like zucchini, bell peppers, or cherry tomatoes. The char marks and vibrant colors create an appealing contrast with the smooth baba ganoush. These Mediterranean dishes work together harmoniously, each enhancing the others’ flavors.
Party and Entertaining Serving Tips
Smart entertaining tips make hosting effortless and enjoyable! Individual portions in small bowls eliminate double-dipping concerns and look incredibly elegant. Your guests will appreciate the thoughtful presentation, and you’ll love how easy it makes serving.
Temperature matters more than most people realize. Serve your baba ganoush at room temperature rather than straight from the refrigerator. The flavors truly shine when they’re not ice-cold, and the texture becomes perfectly creamy and spreadable.
| Serving Style | Best For | Presentation Tips | Guest Count |
|---|---|---|---|
| Large Communal Bowl | Casual gatherings | Create center well, drizzle oil | 8-12 people |
| Individual Portions | Formal parties | Small bowls, individual garnish | 4-20 people |
| Mezze Platter | Mediterranean theme | Multiple dips, varied colors | 6-15 people |
| Sandwich Spread | Lunch parties | Serve alongside bread selection | 4-8 people |
For larger gatherings, consider setting up a DIY pita chip and dip station. Provide various toppings like chopped herbs, different oils, and colorful vegetables. Guests love customizing their own portions, and it becomes an interactive part of your party experience!
These entertaining tips ensure your baba ganoush presentation impresses every time. Remember, the goal is creating an inviting, delicious experience that brings people together around great food and good conversation.
Storage Methods and Recipe Variations
Smart storage methods and creative dietary modifications will help you enjoy baba ganoush in countless new ways! I’m excited to share my favorite tips for keeping this delicious dip fresh and exploring amazing flavor combinations.
Proper Refrigeration and Shelf Life
Your homemade baba ganoush will stay fresh in the refrigerator for up to five days when stored properly. Transfer it to an airtight container immediately after making it.
Here’s my secret trick: always drizzle a thin layer of olive oil on top before sealing the container! This prevents oxidation and keeps your dip looking vibrant and appetizing.
The flavors actually improve overnight, so don’t worry if it tastes even better the next day. That’s completely normal and absolutely delicious!
Freezing Options and Thawing Instructions
You can freeze baba ganoush for up to three months in freezer-safe containers. Leave about an inch of space at the top since it will expand when frozen.
When you’re ready to enjoy it, thaw completely in the refrigerator overnight. The texture might seem slightly different, but don’t panic! Simply stir it well and add a splash of fresh lemon juice to brighten the flavors.
Popular Flavor Variations and Add-ins
These recipe variations will keep your baba ganoush exciting and fresh:
- Spicy kick: Add a pinch of cayenne pepper or diced roasted red peppers
- Extra smoky: Stir in a small amount of smoked paprika
- Mediterranean twist: Fold in crumbled feta cheese and toasted pine nuts
- Herb-infused: Mix in fresh chopped parsley, mint, or cilantro
- Sweet and savory: Add a drizzle of pomegranate molasses
Dietary Modifications and Substitutions
Great news for everyone with special dietary needs! This recipe is naturally vegan and gluten-free, making it perfect for most gatherings.
For those avoiding tahini due to allergies, try these healthy substitutions:
- Cashew butter: Creates a creamy, slightly sweet flavor
- Greek yogurt: Adds protein and tangy richness
- Sunflower seed butter: Nut-free option with earthy taste
Want to make it oil-free? Replace the olive oil with vegetable broth during blending. You’ll still get amazing flavor with fewer calories!
These dietary modifications prove that everyone can enjoy this Mediterranean favorite, regardless of their nutritional needs or preferences.
Troubleshooting Common Baba Ganoush Problems
Even experienced cooks encounter baba ganoush problems, but these troubleshooting tips will save your dip! Don’t let common cooking problems discourage you from making this delicious Middle Eastern favorite. Every challenge has a simple solution that will transform your baba ganoush from disappointing to absolutely divine.
The beauty of homemade baba ganoush lies in its forgiving nature. With a few adjustments and the right techniques, you can rescue any batch and create something truly spectacular!
Fixing Bitter or Overly Smoky Flavors
Bitter baba ganoush usually means your eggplant wasn’t fully cooked or you accidentally included some charred skin. The flesh should be completely soft and creamy throughout. If bitterness strikes, don’t panic!
Add more fresh lemon juice to brighten the flavors immediately. A touch of honey or maple syrup works wonders for balancing flavors and neutralizing that unpleasant bitter taste. Start with just a teaspoon and taste as you go.
Got too enthusiastic with the charring? An overly smoky flavor can overwhelm the delicate eggplant taste. Balance it out by adding extra tahini and lemon juice. You can also fold in a spoonful of plain Greek yogurt to mellow the intensity without compromising the authentic texture.
Adjusting Texture Issues: Too Thick or Too Thin
Fixing texture problems is one of the most common challenges home cooks face. The good news? Both thick and thin consistency issues have straightforward solutions that work every time.
If your baba ganoush resembles paste more than dip, gradually add warm water, olive oil, or even aquafaba (liquid from canned chickpeas). Add just one tablespoon at a time while mixing. This prevents you from going too far in the opposite direction.
Too thin and runny? Add more tahini to thicken naturally. Alternatively, let your baba ganoush rest in the refrigerator for 30 minutes. The mixture naturally thickens as it chills, often solving the problem without any additional ingredients.
Balancing Seasoning and Acidity Levels
Perfect seasoning makes the difference between good and extraordinary baba ganoush. Always taste as you go – this prevents over-seasoning disasters that are much harder to fix than under-seasoning.
Add salt gradually, especially if you’re using salted tahini. Remember that flavors develop and intensify as the dip sits. What tastes perfectly seasoned immediately might become too salty after an hour.
Lemon juice brightens everything and brings all flavors together beautifully. If your baba ganoush tastes flat or dull, a squeeze of fresh lemon usually solves the problem. Too acidic? Balance with a tiny bit of honey or additional tahini.
Preventing and Fixing Separation Problems
Oil pooling on top of your baba ganoush signals separation – a common cooking problem that looks worse than it actually is. This usually happens when tahini wasn’t properly incorporated into the mixture.
Prevention is key: always stir tahini well before adding it to your eggplant. Tahini naturally separates in the jar, so mixing it first ensures smooth integration.
Already separated? Simply give everything a good stir or pulse it in your food processor again. The emulsion will come back together beautifully. For stubborn cases, add a tablespoon of warm water while processing.
| Problem | Cause | Quick Fix | Prevention Tip |
|---|---|---|---|
| Bitter Taste | Undercooked eggplant or charred skin included | Add lemon juice and honey | Cook eggplant until completely soft |
| Too Thick | Not enough liquid ingredients | Add warm water or olive oil gradually | Reserve some cooking liquid from eggplant |
| Too Thin | Excess moisture or over-processing | Add tahini or refrigerate | Drain eggplant well after cooking |
| Oil Separation | Tahini not properly incorporated | Stir well or re-process | Mix tahini before adding to recipe |
Remember, patience and frequent tasting are your best friends when making baba ganoush. These troubleshooting tips will help you create consistently delicious results every single time!
Conclusion
You’re now ready to create amazing homemade baba ganoush that will transform your kitchen into a Middle Eastern cooking haven! This smoky, creamy dip opens up a world of flavors that store-bought versions simply can’t match.
The beauty of making this recipe lies in its flexibility. Each batch becomes your own creation as you adjust seasoning and texture to match your family’s preferences. Don’t worry if your first attempt isn’t perfect – cooking is about learning and having fun!
Your entertaining success depends on dishes that bring people together, and baba ganoush does exactly that. Whether you’re hosting a casual dinner party or contributing to a potluck, this authentic Middle Eastern dip creates memorable moments around your table.
Keep experimenting with the variations we covered. Add roasted red peppers one week, try different herbs the next. Your confidence in Middle Eastern cooking will grow with each delicious batch you create.
Most importantly, enjoy sharing this healthy, flavorful creation with the people you love. Every spoonful represents your dedication to bringing authentic, homemade goodness to your entertaining repertoire. Your guests will taste the difference that comes from cooking with care and passion!
🍆 Love eggplant? Explore more dishes in our roundup: 15 Delicious Eggplant Recipes You Need to Try


One Comment