
(Hey! Some links in this post may be affiliate links — meaning I may earn a small commission if you buy through them, at no extra cost to you. As an Amazon Associate, I earn from qualifying purchases. I only share products I genuinely love and think you’ll find useful too. Read the full disclosure here).
Welcome to my kitchen, where we’re transforming the beloved Italian classic into something absolutely magical! I’m so excited to share this incredible healthy eggplant parmesan recipe with you. It’s everything you love about the traditional dish but without all that heavy frying.
You’ll get those gorgeous golden layers and that melty cheese goodness we all crave. The tender vegetables practically melt in your mouth! This recipe is perfect for busy weeknights when you want something comforting yet nutritious.
Trust me, your family will never guess it’s the lighter version. We’re going to walk through every single step together – from selecting the perfect produce to achieving that picture-perfect golden top. Get ready to fall in love with this wholesome twist on a timeless favorite!
Contents
- 1 Understanding Eggplant Selection and Preparation Basics
- 2 Gathering Your Ingredients and Equipment
- 3 Step 1: Preparing and Salting the Eggplant
- 4 Step 2: Creating the Breading Station
- 5 Step 3: Coating and Pre-Baking the Eggplant
- 6 Step 4: Assembling Your Baked Eggplant Parmesan
- 7 Step 5: Final Baking and Timing Guidelines
- 8 Troubleshooting Common Issues and Pro Tips
- 9 Conclusion
Key Takeaways
- This baked eggplant parmesan eliminates heavy frying for a healthier approach
- Perfect weeknight dinner that’s both comforting and nutritious
- Achieves the same golden layers and melty cheese as the traditional version
- Family-friendly recipe that doesn’t taste like a “diet” version
- Step-by-step guidance ensures perfect results every time
- Wholesome ingredients create a satisfying, guilt-free meal
Understanding Eggplant Selection and Preparation Basics
Let me share the secrets to picking and preparing eggplant that will transform your cooking! Getting your eggplant selection right is like finding the perfect dance partner – it makes all the difference in your final dish. I want you to feel confident walking through that produce section, knowing exactly what to look for.
The foundation of amazing eggplant parmesan starts with understanding these essential basics. Once you master these simple techniques, you’ll create restaurant-quality results every single time!
Choosing the Perfect Eggplant
When you’re selecting your eggplant, you want one that feels firm and heavy for its size. That means it’s nice and fresh! The skin should be glossy and smooth, like it’s been polished, with a deep purple color that just screams “pick me!”
Avoid any eggplants with soft spots, wrinkles, or brown patches. Those are signs they’re past their prime. Here’s a little secret I learned from my Italian grandmother: gently press the eggplant with your thumb – if it springs back, you’ve got a winner!
| Quality Indicator | What to Look For | What to Avoid |
|---|---|---|
| Skin Appearance | Glossy, smooth, deep purple | Dull, wrinkled, brown patches |
| Feel Test | Firm, heavy, springs back | Soft spots, mushy areas |
| Stem Area | Green, fresh-looking cap | Brown, dried, moldy cap |
| Overall Shape | Even, well-formed | Irregular, damaged areas |
Essential Pre-Cooking Preparation Steps
Once you get your beautiful eggplant home, proper eggplant preparation is what transforms a potentially bitter, watery vegetable into creamy, delicious perfection. Don’t skip this part!
First, give it a good wash and pat it completely dry. Moisture is not our friend when we’re aiming for that perfect crispy texture. We’ll be salting our eggplant in the next steps, but this initial prep sets the stage for success.
Gathering Your Ingredients and Equipment
Let’s gather everything we need for this amazing eggplant parmesan – trust me, being prepared makes all the difference! Having your eggplant parmesan ingredients and tools organized before you start cooking transforms the entire experience from stressful to enjoyable.
I always tell my friends that successful cooking starts with good preparation. When everything is within arm’s reach, you’ll feel like a professional chef in your own kitchen!
Complete Ingredient Checklist
Your shopping list should include fresh, quality ingredients that make this dish shine. You’ll need about two pounds of medium eggplant – this gives you plenty to work with without overwhelming your baking dish.
For the coating and assembly, grab eggs for binding, seasoned breadcrumbs for that perfect crunch, and good-quality marinara sauce. I recommend getting a chunky variety because it adds incredible flavor and texture!
The cheese selection is crucial for authentic taste. Fresh mozzarella and real Parmesan cheese make such a difference compared to pre-shredded options. Don’t forget olive oil, salt, pepper, and fresh basil if available – these finishing touches elevate everything!
Required Kitchen Tools and Bakeware
Your baking equipment setup determines how smoothly this recipe flows. You’ll need two large baking sheets because space matters when you’re working with multiple eggplant slices.
A 9×13 inch baking dish works perfectly for assembly, while three shallow bowls create your breading station. These Italian cooking tools might seem basic, but they’re essential for success!
| Essential Equipment | Purpose | Size/Type | Pro Tip |
|---|---|---|---|
| Baking Sheets | Initial eggplant baking | Two large sheets | Line with parchment paper |
| Baking Dish | Final assembly | 9×13 inch | Glass or ceramic works best |
| Sharp Knife | Slicing eggplant | 8-10 inch chef’s knife | Keep blade clean between cuts |
| Shallow Bowls | Breading station | Three medium bowls | Wide bowls work easier |
Keep paper towels handy for the salting process, and grab cooking spray for greasing. A wire cooling rack helps with even browning if you have one available!
Step 1: Preparing and Salting the Eggplant
Getting your eggplant ready is the most crucial step that separates good dishes from absolutely amazing ones! This foundation technique will transform your eggplant from potentially bitter and watery to tender perfection. The salting eggplant process is like giving your vegetables a spa treatment that draws out unwanted moisture and bitter compounds.
Proper Slicing Techniques
Let’s start with the perfect cut that ensures even cooking throughout your dish. You’ll want to create consistent rounds that measure exactly ½ inch thick. This thickness is the sweet spot – not too thin where they’ll fall apart, and not too thick where they won’t cook evenly.
Begin your eggplant slicing by trimming off the top and bottom portions. Then slice straight down to create uniform rounds. Consistency is key here because it ensures every piece cooks at the same rate!
Salt-Drawing Process for Moisture Control
Now comes the game-changing technique that professional chefs swear by! Arrange your eggplant slices in a single layer on paper towels or clean kitchen towels. Generously sprinkle both sides with coarse salt – don’t be shy about this step.
This salting eggplant method pulls out excess water and bitter compounds naturally. You’ll actually see little droplets forming on the surface after about 30 minutes. That’s exactly what we want to see!
These effective moisture removal techniques ensure your final dish won’t be soggy or bitter. The salt works like magic to prepare your eggplant for maximum flavor absorption.
Drying and Patting Methods
After the 30-minute waiting period, it’s time for the final preparation step. Use paper towels to thoroughly pat each slice completely dry. This step is absolutely essential for achieving that crispy, golden exterior we’re after!
Press gently but firmly to remove all surface moisture. The better you dry them now, the more perfectly crispy your finished eggplant parmesan will be. These moisture removal techniques set you up for restaurant-quality results every single time!
Step 2: Creating the Breading Station
Let’s dive into setting up your three-station breading system for maximum efficiency and flavor! This breading station setup transforms your kitchen counter into a professional assembly line. You’ll love how organized and smooth this process becomes once everything is in place.
The key to success lies in proper preparation and spacing. Give yourself plenty of room to work comfortably. Trust me, you don’t want to feel cramped when you’re coating those beautiful eggplant slices!
Setting Up Your Three-Station System
Arrange three shallow dishes in a neat row from left to right. The first bowl gets one cup of all-purpose flour – this helps the egg stick better. Your second bowl needs two to three beaten eggs whisked until smooth.
The third bowl is where the magic happens with your breadcrumb mixture! Keep these bowls close together but not touching. This spacing prevents cross-contamination and keeps your coating technique clean and efficient.
Here’s my favorite pro tip: designate one hand for dry ingredients and one for wet. This prevents you from getting completely covered in breadcrumbs!
Seasoning the Breadcrumb Mixture
Your seasoned breadcrumbs are the star of this show! Combine two cups of panko breadcrumbs with half a cup of freshly grated Parmesan cheese. The Parmesan adds incredible nutty flavor and helps achieve that golden-brown perfection.
Add one teaspoon each of garlic powder and Italian seasoning. Finish with salt and pepper to taste. Mix everything thoroughly with a fork until well combined.
The aroma alone will make your kitchen smell like an authentic Italian restaurant! This seasoning blend creates the perfect crispy coating that everyone will rave about.
Step 3: Coating and Pre-Baking the Eggplant
Now comes the exciting part where we transform our prepared eggplant slices into golden, crispy baked eggplant! This step is where your assembly line setup really shines. You’ll love how smoothly this process flows when everything is organized perfectly.
Preheat your oven to 400°F while you work – timing is everything in great cooking! The heat needs to be just right for achieving that perfect crunch we’re after.
Efficient Breading Techniques
Here’s where those breading techniques make all the difference! Take each dried eggplant slice and start with the flour station. Dredge both sides completely – this helps everything stick better.
Next, dip the floured slice into your beaten egg mixture. Make sure both sides get coated evenly. Don’t rush this step!
Finally, press the eggplant into your seasoned breadcrumbs. I like to gently press the breadcrumbs into the surface to make sure they really stick. We want every single bite to have that incredible crunch!
Arranging on Baking Sheets
Line your baking sheets with parchment paper and give them a light spray of cooking oil. This prevents sticking and adds extra crispiness to your coating!
Arrange your coated eggplant slices in a single layer. Make sure they’re not touching each other – overcrowding leads to steaming instead of crisping, and we definitely don’t want that!
Give each slice a light spray of cooking oil on top. This is your secret weapon for achieving that gorgeous golden color!
Initial Baking for Crispiness
These oven baking methods will give you restaurant-quality results at home! Bake for 15-20 minutes, flipping once halfway through. You’ll know they’re ready when they look like golden coins of deliciousness!
The smell will be absolutely incredible as they transform in the oven. Watch for that beautiful golden-brown color – that’s your visual cue for perfect crispiness!
Your eggplant slices should feel firm and sound slightly crispy when you tap them gently. This initial baking creates the foundation for an amazing final dish!
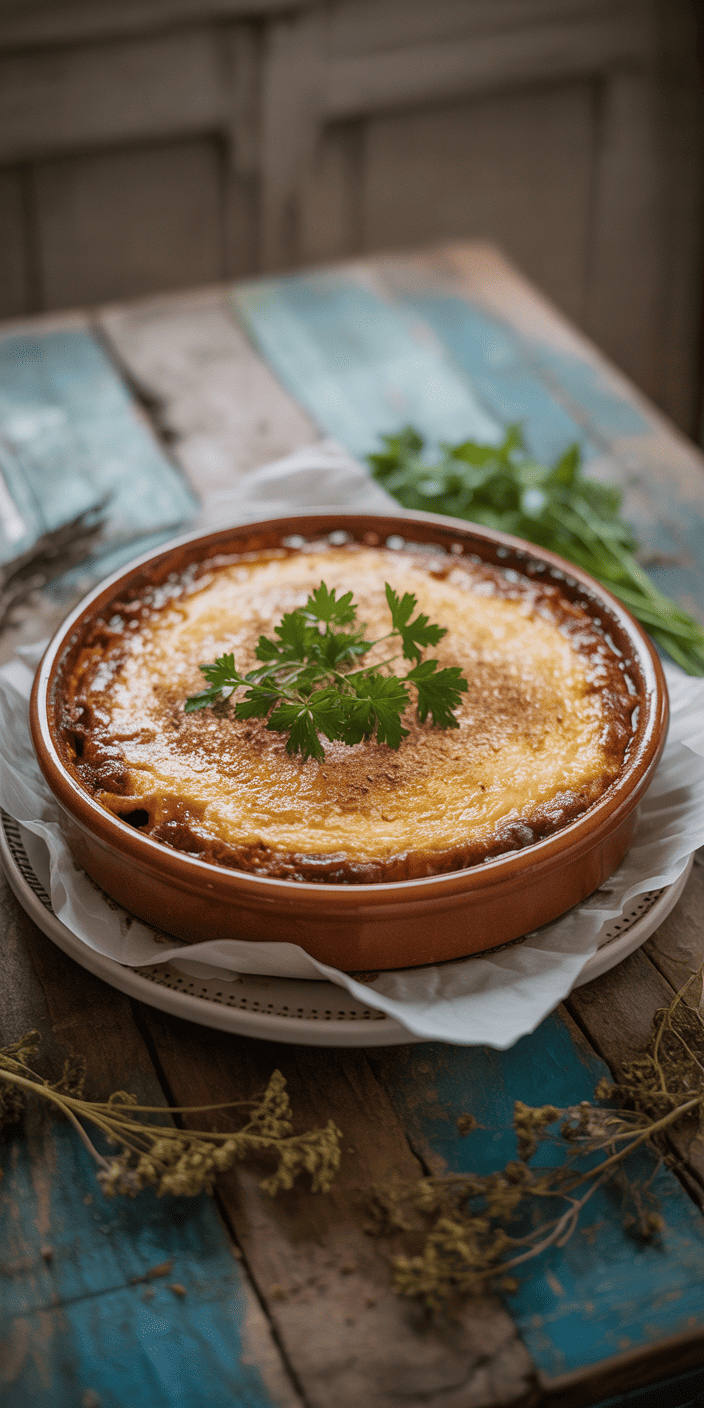
Step 4: Assembling Your Baked Eggplant Parmesan
This is where the magic truly happens – building your eggplant parmesan assembly layer by layer! I absolutely love this part because you get to see your beautiful dish come together. Start by prepping your baking dish with a light coating of cooking spray. This prevents sticking and makes cleanup so much easier!
You can also spread a thin layer of marinara sauce on the bottom for extra flavor. Trust me, this little trick makes a huge difference in taste!
Sauce Layering Strategy
The secret to perfect marinara sauce distribution is using the right amount at each level. You’ll want about 2-3 cups of sauce total for your entire dish. Here’s my proven layering technique:
- Use 1/3 of your sauce for each layer
- Spread evenly but don’t go overboard
- Leave small gaps so sauce can settle naturally
- Keep sauce away from dish edges to prevent burning
Too much sauce creates a soggy mess. Too little leaves dry spots that nobody wants to bite into!
Cheese Distribution Methods
Now for the cheese layers – this is where your dish gets that gorgeous, bubbly top! I use about 2 cups of mozzarella total, either shredded or fresh torn into pieces. Here’s how to distribute it perfectly:
- Sprinkle 1/3 of mozzarella over each sauce layer
- Add generous handfuls of grated Parmesan
- Don’t press cheese down – let it sit naturally
- Save extra cheese for the final top layer
Fresh mozzarella creates amazing stretchy pulls when you serve it. Shredded works great too and melts more evenly!
Creating Perfect Layers
Here’s my step-by-step eggplant parmesan assembly process that creates restaurant-quality results every time:
- First layer: Arrange golden eggplant slices in single layer (no overlapping!)
- Add sauce: Spread 1/3 of marinara sauce evenly
- Cheese time: Sprinkle 1/3 mozzarella and Parmesan generously
- Repeat twice more: Eggplant, sauce, cheese for three total layers
- Top layer bonus: Make it extra cheesy for that perfect golden finish!
Take a moment to admire your beautiful creation before it goes into the oven. You’ve just assembled something absolutely incredible that’s going to make everyone’s mouth water!
Step 5: Final Baking and Timing Guidelines
The moment you’ve been waiting for has arrived – it’s time to bake your beautiful eggplant parmesan creation! This final step transforms all your careful layering into a golden, bubbly masterpiece that’ll have everyone asking for seconds.
Cover your assembled dish with aluminum foil to prevent the top from browning too quickly. This technique ensures even heating throughout while protecting the cheese from burning.
Temperature and Timing Specifications
Getting the baking temperature right is crucial for perfect results. Preheat your oven to 375°F – this temperature creates the ideal balance between thorough heating and beautiful browning.
Your cooking time breaks down into two phases. First, bake covered for 25 minutes to heat the interior completely. Then remove the foil and bake uncovered for another 15-20 minutes until gorgeously golden.
| Baking Phase | Temperature | Time | Coverage |
|---|---|---|---|
| Initial Heating | 375°F | 25 minutes | Covered with foil |
| Final Browning | 375°F | 15-20 minutes | Uncovered |
| Total Cooking Time | 375°F | 40-45 minutes | Mixed coverage |
Visual Doneness Indicators
Recognizing eggplant parmesan doneness becomes easy once you know what to look for! The cheese should be melted and lightly browned on top, creating those irresistible golden patches.
Watch for sauce bubbling around the edges – this indicates the interior is properly heated. A knife inserted in the center should come out hot, confirming your dish has reached the ideal internal temperature of 165°F.
Resting Period Importance
Here’s the hardest part – you must let your masterpiece rest for 10-15 minutes before cutting! This waiting period allows the layers to set properly, preventing a messy situation when serving.
Use this time wisely by preparing a fresh salad or warming crusty bread. Trust me, this resting period makes all the difference between a restaurant-quality presentation and a delicious but sloppy serving!
Troubleshooting Common Issues and Pro Tips
After years of perfecting this recipe, I’ve discovered the secrets to flawless results every single time! These eggplant parmesan tips will help you navigate any challenge and create a dish that’s absolutely restaurant-worthy.
Preventing Soggy Results
The biggest enemy of great eggplant parmesan is excess moisture – it’s what turns your masterpiece into a disappointing, watery mess. Avoiding soggy eggplant starts with that crucial salting step we covered earlier, but here are my extra insider tricks!
Make sure your marinara sauce isn’t too watery. If it seems thin, simmer it uncovered for a few minutes to concentrate those flavors and thicken it up. Never skip the pre-baking step for your breaded eggplant slices – this removes even more moisture and creates that essential crispy foundation.
Another pro tip: let your assembled casserole rest for 10-15 minutes before the final bake. This allows the layers to settle and prevents sliding when you cut into it!
Achieving Golden-Brown Perfection
Want that gorgeous, Instagram-worthy golden top? Switch to the broiler for the last 2-3 minutes of baking time. Watch it like a hawk though – broilers work fast!
If your cheese isn’t browning enough, sprinkle a light layer of extra Parmesan on top before that final broil. The key is using freshly grated cheese rather than pre-shredded for the best melting and browning results.
Make-Ahead and Storage Tips
Here’s fantastic news for busy cooks – this make-ahead recipe is perfect for meal planning! You can assemble the entire casserole up to 24 hours in advance and refrigerate it. Just pop it in the oven when you’re ready to eat.
For longer storage, this dish freezes beautifully for up to 3 months. Wrap it tightly in plastic wrap and aluminum foil, then thaw overnight in the fridge before baking.
Leftovers reheat wonderfully in a 350°F oven until heated through. Pro tip: individual portions reheat faster and more evenly than trying to reheat the whole pan!
Conclusion
You’ve now discovered the secrets to creating an incredible healthy Italian recipe that delivers all the comfort and flavor of traditional eggplant parmesan! This baked version proves you don’t need to sacrifice taste for nutrition.
Your baked eggplant parmesan success comes from mastering each step we’ve covered together. From selecting the perfect eggplant to achieving that golden-brown finish, you’ve learned techniques that will serve you well in countless future cooking adventures.
The beauty of this dish lies in its versatility. Serve it as a satisfying weeknight dinner, impress guests at your next gathering, or prep portions for busy weeks ahead. Each bite delivers layers of rich marinara, creamy melted cheese, and perfectly seasoned eggplant.
Remember that cooking is a journey of discovery. Every time you make this recipe, you’ll notice new details and develop your own personal touches. Trust the process, embrace the aromas filling your kitchen, and enjoy the satisfaction of creating something truly special from scratch.
Now it’s time to gather your ingredients, preheat that oven, and create your own delicious masterpiece. Your family and friends are in for such a treat!
🍆 Love eggplant? Explore more dishes in our roundup: 15 Delicious Eggplant Recipes You Need to Try


2 Comments