(Hey! Some links in this post may be affiliate links — meaning I may earn a small commission if you buy through them, at no extra cost to you. As an Amazon Associate, I earn from qualifying purchases. I only share products I genuinely love and think you’ll find useful too. Read the full disclosure here).
Welcome to one of my absolute favorite comfort food creations! This eggplant zucchini gratin transforms simple summer vegetables into something truly spectacular. I’m so excited to share this Mediterranean gratin with you because it’s honestly one of those dishes that makes everyone go “wow!”
The combination of tender, creamy layers with that gorgeous golden top is simply irresistible. Whether you’re planning an impressive side dish for your next dinner party or craving a hearty vegetarian main course, this recipe delivers every single time.
I love how this vegetable gratin recipe takes humble garden vegetables and turns them into something restaurant-worthy. But don’t worry – it’s completely doable in your own kitchen! We’ll walk through every step together, from selecting the perfect produce to achieving that beautiful golden finish.
Contents
- 1 What Makes This Mediterranean Gratin So Special
- 2 Essential Ingredients for Your Eggplant Zucchini Gratin
- 3 Kitchen Equipment and Tools You’ll Need
- 4 Preparing Your Vegetables Like a Pro
- 5 Making the Perfect Cheese Sauce
- 6 Step-by-Step Assembly Instructions
- 7 Baking Techniques for Golden Perfection
- 8 Serving Your Gratin with Style
- 9 Storage, Reheating, and Meal Planning
- 10 Conclusion
Key Takeaways
- Perfect way to transform summer vegetables into an elegant, restaurant-quality dish
- Works beautifully as both a impressive side dish and satisfying vegetarian main course
- Features tender, creamy layers topped with a gorgeous golden, bubbly finish
- Completely achievable for home cooks using simple kitchen techniques
- Mediterranean-inspired flavors that appeal to all palates and dietary preferences
- Step-by-step guidance ensures perfect results every time you make it
What Makes This Mediterranean Gratin So Special
What sets this eggplant zucchini gratin apart is the magical way these Mediterranean gratin vegetables transform into something absolutely extraordinary! I’ve discovered that when you combine the right ingredients with proven techniques, you create a dish that’s both comforting and impressive.
The Perfect Vegetable Combination
The genius behind this vegetable combination lies in how beautifully these two stars complement each other. Zucchini brings a mild, slightly sweet flavor that stays wonderfully tender yet firm. Meanwhile, eggplant contributes a rich, almost meaty texture that becomes incredibly creamy when baked.
Together, they create these amazing layers that soak up all those delicious flavors while keeping their own unique characteristics. It’s like they were meant to be together!
Health Benefits of Eggplant and Zucchini
This healthy gratin recipe proves that comfort food can actually be good for you! Eggplant is packed with powerful antioxidants that help fight inflammation. It’s also loaded with fiber, which keeps you feeling satisfied longer.
Zucchini brings its own nutritional superpowers to the party. You’re getting vitamins C and A, plus potassium and folate. When you combine these vegetables, you’re creating a dish that nourishes your body while satisfying your taste buds!
Why This Recipe Works Every Time
I’ve tested this Mediterranean gratin countless times, and I’ve figured out all the little secrets that guarantee success. The salt treatment removes excess moisture, preventing a watery gratin. The perfect cheese sauce ratio ensures creamy richness without being heavy.
Most importantly, the ideal baking temperature creates that gorgeous golden top while keeping the interior perfectly creamy. This isn’t a finicky recipe – it’s designed for consistent, delicious results!
Essential Ingredients for Your Eggplant Zucchini Gratin
The secret to an incredible eggplant zucchini gratin starts with choosing the right cooking ingredients! When you select quality produce and the perfect cheese blend, you’re already halfway to creating something truly spectacular. Let me walk you through exactly what to look for when shopping for this amazing dish.
Selecting the Best Eggplant
Shopping for fresh eggplant is all about using your senses! I always pick up each eggplant to feel its weight – the best ones feel heavy for their size. The skin should be smooth and shiny, almost like it’s been polished.
Give it a gentle press with your finger. Good eggplant bounces right back! Avoid any with soft spots, wrinkled skin, or brown patches. These are signs the vegetable is past its prime and won’t give you that perfect texture we’re after.
Choosing Fresh Zucchini
Smart zucchini selection makes such a difference in your final dish! I always go for medium-sized zucchini, about 6 to 8 inches long. They have the perfect balance of flavor and won’t be too watery or seedy.
Look for bright green skin with no blemishes or soft spots. The zucchini should feel firm and heavy in your hand. Those giant zucchini might look impressive, but they’re often watery and won’t slice beautifully for our gratin.
Cheese Selection Guide
Here’s where the magic happens with your gratin cheese choices! I use a winning combination of Gruyère and Parmesan that creates the most incredible flavor profile. Gruyère melts like a dream and brings that nutty, complex taste we love.
Parmesan adds the sharp, salty punch that makes everything sing together! If you can’t find Gruyère, Swiss cheese or sharp cheddar work wonderfully too. Just make sure your gratin cheese is freshly grated – it melts so much better than pre-shredded.
Herbs, Spices, and Aromatics
Fresh thyme and garlic are absolutely essential for that authentic Mediterranean warmth! I also love adding a pinch of nutmeg to the cheese sauce – trust me, it makes such a difference. Fresh basil for garnish adds the most beautiful pop of color and flavor.
Don’t forget good quality olive oil for drizzling and butter for your béchamel base. Salt and freshly ground black pepper are obvious must-haves. I always keep fresh parsley on hand for that final touch of brightness that makes everything look restaurant-perfect!
Kitchen Equipment and Tools You’ll Need
Let’s talk about the essential kitchen tools that’ll transform your gratin-making experience! Having the right cooking equipment makes this recipe so much easier and more enjoyable. You don’t need fancy gadgets, but a few key pieces will help you create restaurant-quality results at home.
Baking Dish Options and Sizes
Your gratin baking dish is the star of the show! I absolutely love using a 9×13 inch ceramic dish because it distributes heat so evenly. Glass dishes work beautifully too and let you admire those gorgeous layers as they bake.
For smaller gatherings, an 8×8 inch dish is perfect. Just adjust your ingredient amounts accordingly! Pro tip: ceramic retains heat longer, so your gratin stays warm at the table.
Essential Prep Tools
You’ll need some basic kitchen tools to prep your vegetables perfectly. A sharp chef’s knife is absolutely crucial for even slicing! Pair it with a large cutting board for plenty of workspace.
Don’t forget a large colander for the salt treatment step. A medium saucepan and good whisk are essential for creating that dreamy cheese sauce. These simple tools make all the difference!
Optional Equipment for Professional Results
Want to take your gratin to the next level? A mandoline slicer creates those perfectly uniform vegetable slices that look absolutely stunning. A fine-mesh strainer helps achieve the smoothest cheese sauce possible.
A kitchen scale ensures consistent results every time. But honestly, I’ve made amazing gratins with just basic tools! Good knife skills and patience are your best friends.
| Equipment Type | Essential Option | Professional Upgrade | Key Benefit |
|---|---|---|---|
| Baking Dish | 9×13 ceramic dish | High-end ceramic gratin dish | Even heat distribution |
| Slicing Tool | Sharp chef’s knife | Mandoline slicer | Uniform vegetable slices |
| Sauce Making | Basic whisk | Fine-mesh strainer | Smooth, lump-free sauce |
| Measuring | Standard measuring cups | Digital kitchen scale | Precise ingredient ratios |
Preparing Your Vegetables Like a Pro
Perfect vegetable preparation is the foundation that separates ordinary gratins from extraordinary ones! When you master these essential techniques, you’ll create layers that hold their shape beautifully and deliver incredible flavor in every bite.
Proper Slicing Techniques
Getting your cuts just right makes all the difference in how your gratin cooks and looks. Uniform slices ensure even cooking throughout every layer!
Eggplant Slicing Method
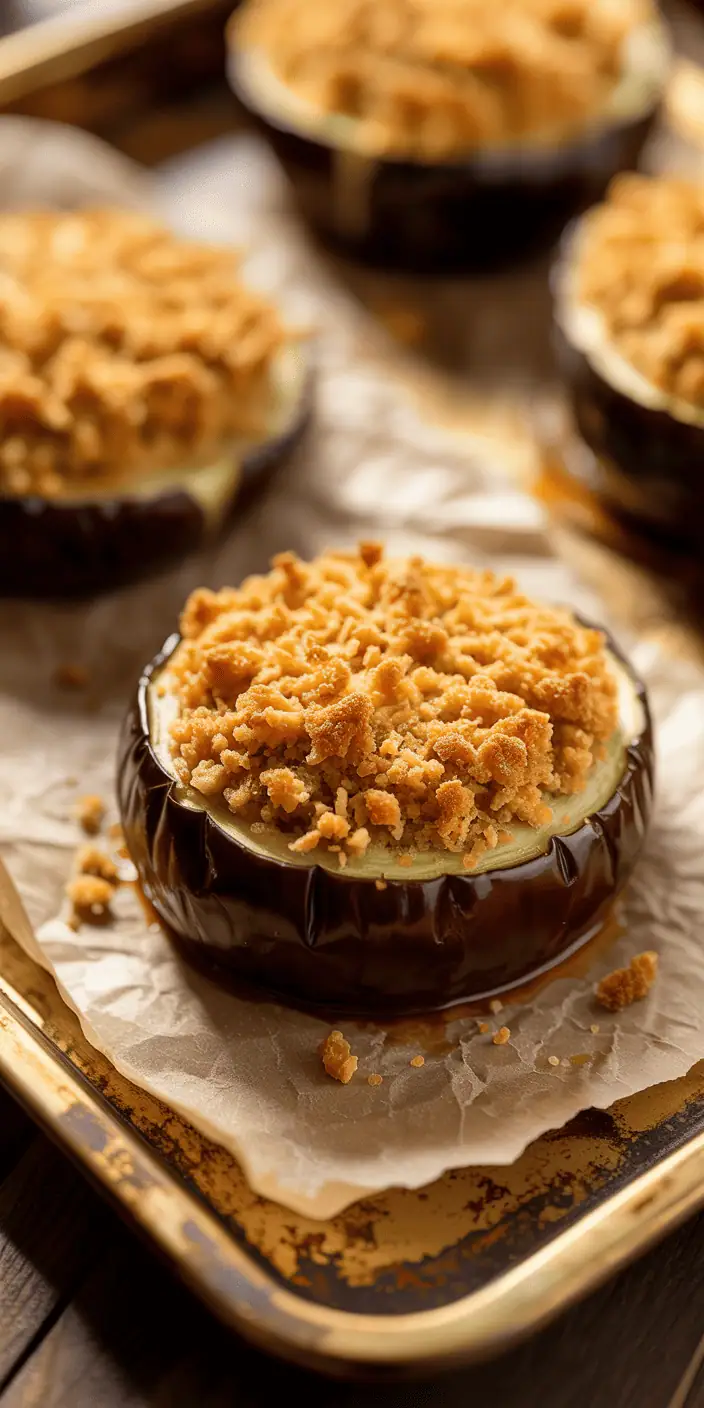
I always cut my eggplant into rounds about ¼ to ⅜ inch thick. This thickness gives you slices that cook evenly without falling apart.
Start from the stem end and work your way down. Use a gentle sawing motion with your knife – eggplant skin can be tough, but we don’t want to crush that tender flesh inside!
Zucchini Cutting Technique
For zucchini cutting, I prefer slightly thinner slices at about ¼ inch thick. Cut them on a slight diagonal if your zucchini is long and narrow.
This creates those beautiful oval shapes that layer so elegantly in your dish. Straight cuts work perfectly for rounder zucchini!
Salt Treatment for Better Texture
Here’s the game-changing step that transforms your gratin! Salt treatment draws out excess moisture and any bitterness from your eggplant.
Lay all your eggplant slices on paper towels and sprinkle them generously with salt. Let them sit for 30 minutes – this waiting time is absolutely worth it!
Pat the slices completely dry with fresh paper towels before using them. You’ll be amazed at how much moisture comes out!
Pre-cooking Options
Pre-cooking your vegetables prevents that dreaded watery gratin. You have two fantastic methods to choose from!
Roasting Method
Brush your vegetable slices with olive oil and roast them at 400°F for about 15 minutes. They should be just tender when done.
This method concentrates the flavors beautifully and lets you cook all your vegetables at once. It’s my personal favorite for busy weeknights!
Pan-Searing Technique
Heat olive oil in a large skillet and cook the slices for 2-3 minutes per side until golden. This creates gorgeous caramelized edges that add incredible depth of flavor.
Pan-searing takes a bit more time since you’ll work in batches, but those caramelized bits are absolutely worth the extra effort!
| Prep Method | Time Required | Best Results | Difficulty Level |
|---|---|---|---|
| Salt Treatment | 30 minutes | Removes bitterness, reduces moisture | Easy |
| Roasting | 15 minutes | Concentrated flavors, batch cooking | Easy |
| Pan-Searing | 20-25 minutes | Caramelized edges, rich flavor | Moderate |
| Raw Assembly | 5 minutes | Quick prep, softer texture | Very Easy |
Making the Perfect Cheese Sauce
Nothing elevates a vegetable gratin quite like a perfectly crafted, creamy cheese sauce! This golden, silky sauce transforms ordinary vegetables into something absolutely divine. I’m going to walk you through every step to ensure your sauce turns out flawlessly every single time.
The secret lies in building flavors layer by layer. We’ll start with a classic French technique, then add our own special touches that make this gratin sauce truly exceptional!
Creating a Smooth Béchamel Base
Your béchamel sauce foundation is everything! Start by melting 3 tablespoons of butter in a heavy-bottomed saucepan over medium heat. Once it’s gently foaming, whisk in 3 tablespoons of all-purpose flour.
Cook this mixture for exactly 2 minutes while whisking constantly. This is your roux – it should smell nutty and look slightly golden. Don’t rush this step!
Now comes the crucial part: slowly add 2 cups of warm milk while whisking continuously. I always heat my milk first because cold milk creates lumps. Add it gradually, about ¼ cup at a time initially, then in a steady stream.
Cheese Integration Techniques
Remove your smooth sauce from heat before adding cheese – this prevents stringiness! I use 1 cup of grated Gruyère and ½ cup of Parmesan for the perfect flavor balance.
Add cheese gradually while whisking gently. The residual heat melts everything beautifully without making it tough or grainy. Watch it transform into liquid gold!
Seasoning and Flavoring
This is where your cheese sauce really sings! Add a generous pinch of fresh nutmeg – it’s absolutely magical with cheese. Season with salt, white pepper, and just a tiny pinch of cayenne for warmth.
Taste as you go and adjust accordingly. Your sauce should be rich, creamy, and perfectly balanced.
Fixing Common Sauce Problems
Don’t panic if things go wrong! Here’s your troubleshooting guide:
| Problem | Cause | Quick Fix | Prevention |
|---|---|---|---|
| Lumpy texture | Cold milk added too fast | Strain through fine mesh | Use warm milk, whisk constantly |
| Too thick | Overcooked or too much flour | Whisk in warm milk gradually | Watch cooking time carefully |
| Too thin | Not enough flour or undercook | Cook longer while whisking | Measure accurately, cook roux fully |
| Stringy cheese | Added cheese while too hot | Remove from heat, whisk gently | Cool base before adding cheese |
Your finished sauce should coat the back of a spoon but still pour easily. Once you master this technique, you’ll be making béchamel sauce for everything!
Step-by-Step Assembly Instructions
Now comes the exciting part where we transform our prepared ingredients into a stunning gratin masterpiece! This is where all your careful prep work pays off, and I promise you’ll feel like a true chef as we build these gorgeous layers together. The key to perfect gratin assembly is taking your time and being methodical with each step.
First Layer Foundation
Start your gratin construction by generously buttering your baking dish – this prevents sticking and adds incredible flavor! Spread a thin layer of your cheese sauce across the bottom, creating a silky foundation for your vegetables. This base layer ensures even cooking and prevents your beautiful vegetables from drying out.
The foundation layer acts like a cushion that protects your vegetables while they bake. I love how this step sets us up for success right from the start!
Vegetable Layering Pattern
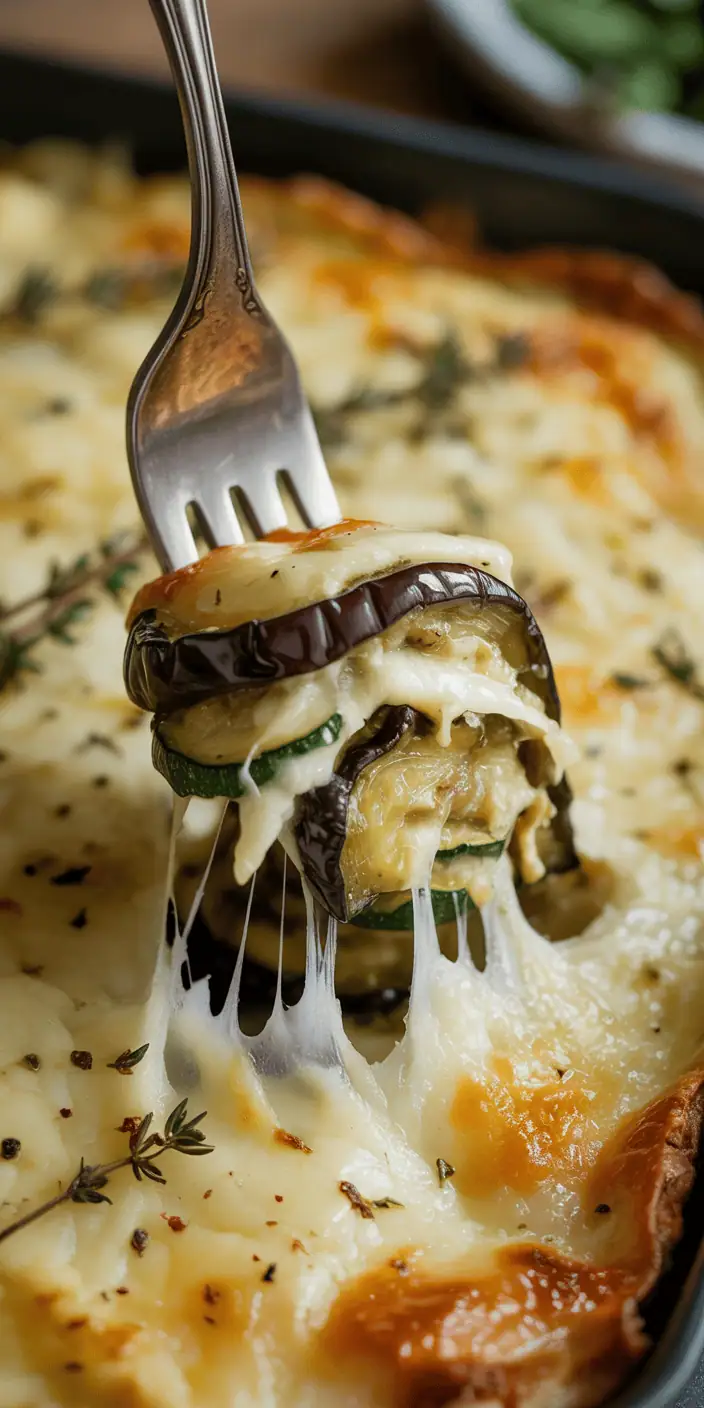
Here’s where your layering technique really shines! Arrange your eggplant and zucchini slices in overlapping rows, alternating between the two vegetables. Each slice should overlap the previous one by about half – this creates those stunning visual stripes everyone will admire.
Keep your angles consistent for a professional look. I like to start with eggplant along one edge, then zucchini, creating this beautiful checkerboard pattern. The key is maintaining steady overlap and keeping your slices at the same angle throughout.
Sauce Distribution Method
Smart sauce distribution makes all the difference in your final result! Use about one-third of your cheese sauce between your vegetable layers, saving the rest for the gorgeous top coating. After your first layer of vegetables, drizzle sauce lightly over them – just enough to coat without drowning.
Add your second layer of vegetables, then another light sauce coating. This method ensures every bite has perfect sauce distribution without making your gratin soggy. Less is more when it comes to between-layer saucing!
Creating the Perfect Top Layer
Your final vegetable layers deserve special attention because this is what everyone sees first! Arrange your most beautiful slices in the most appealing pattern you can create – think of it as edible art. Pour your remaining cheese sauce evenly over the top, making sure it flows into all the spaces between vegetables.
Finish with a generous sprinkle of extra Parmesan and fresh thyme leaves for that restaurant-quality presentation. The top should be completely covered with sauce while still showcasing your stunning vegetable pattern underneath. This final touch gives us that golden, bubbly top we’re all dreaming about!
Baking Techniques for Golden Perfection
Getting that absolutely gorgeous golden perfection is what transforms your gratin from good to restaurant-quality amazing! The magic happens in your oven, and I’m going to share all my secrets for baking gratin that looks and tastes incredible every single time.
Trust me, once you master these techniques, you’ll be so proud of your beautiful results!
Oven Setup and Temperature Control
Your oven temperature setup is absolutely crucial for success! I always position my oven rack in the upper third and preheat to 375°F.
This temperature is perfect because it’s hot enough to create that stunning golden crust without overcooking your tender vegetables. If you have a convection setting, this is the perfect time to use it – it gives you even more gorgeous browning!
Timing and Baking Stages
The secret to perfect gratin lies in understanding the two distinct baking stages. I bake covered with foil for the first 30 minutes to ensure everything cooks through evenly.
Then I remove the foil for the final 15-20 minutes to achieve that stunning golden top. The covered stage creates steam that helps everything cook perfectly, while the uncovered stage gives us that crispy, golden surface we’re after!
Achieving the Perfect Golden Top
This is honestly my favorite part of the whole process! After removing the foil, watch your gratin carefully – you want that beautiful golden-brown color that looks absolutely professional.
If it’s not browning enough, pop it under the broiler for just 2-3 minutes. But watch it like a hawk – broilers work fast! The golden top should be bubbling enthusiastically and gorgeously golden.
Testing for Doneness
Testing gratin doneness is easy once you know what to look for! Insert a knife into the center – it should slide through the vegetables easily with no resistance.
The top should be golden and bubbling. If you gently shake the dish, the center should be just barely set, not liquidy.
| Baking Stage | Time | Temperature | What to Look For |
|---|---|---|---|
| Covered Phase | 30 minutes | 375°F | Vegetables tender, sauce bubbling |
| Uncovered Phase | 15-20 minutes | 375°F | Golden browning, active bubbling |
| Broiler Finish | 2-3 minutes | High Broil | Deep golden color, crispy top |
| Resting Period | 10-15 minutes | Room temp | Layers set, easy slicing |
Let it rest for 10-15 minutes before serving – this is crucial! This resting time allows the layers to set up properly and makes slicing so much easier. I know it’s tempting to dive right in, but trust me, the wait is absolutely worth it for those perfect, distinct layers!
Serving Your Gratin with Style
Your beautiful gratin deserves a presentation that matches its incredible flavor! The way you serve this Mediterranean masterpiece can transform a simple dinner into a memorable dining experience. Let me share my favorite techniques for making your gratin look as amazing as it tastes.
Resting and Portioning Tips
Patience is key when serving gratin! Let your golden creation rest for 10-15 minutes after removing it from the oven. This crucial step allows the layers to set properly and prevents a messy collapse when you cut into it.
Use a sharp knife to cut clean, even portions. I always wipe my knife clean between cuts to keep those gorgeous layers looking distinct and beautiful. A large serving spatula works perfectly for lifting out portions without them falling apart!
Main Course Presentation
This gratin presentation works beautifully as a vegetarian centerpiece! I love serving it family-style right from the baking dish – it’s so rustic and inviting. The golden top and visible layers create a stunning visual impact that gets everyone excited.
For more formal occasions, individual portions on warmed plates look absolutely restaurant-quality. The beautiful layers speak for themselves and need no fancy plating tricks!
Side Dish Pairings
These side dish pairings complement your gratin perfectly! It’s divine alongside roasted chicken, grilled lamb, or even a simple green salad for lighter meals. I love pairing it with crusty bread and crisp white wine for the ultimate Mediterranean experience.
This versatile dish works beautifully as part of holiday spreads too. It’s elegant enough for special occasions but comforting enough for everyday dinners!
Garnishing and Final Touches
Simple garnish ideas make all the difference! A sprinkle of fresh herbs like basil, thyme, or parsley adds that perfect pop of color and freshness. A light drizzle of good olive oil just before serving adds richness and shine.
Sometimes I add a few cherry tomatoes or a small arugula salad on the side for extra Mediterranean flair. The key is keeping garnishes simple – this beautiful gratin is already the star of the show!
Storage, Reheating, and Meal Planning
Transform your gratin into the ultimate make-ahead meal with these game-changing storage tips! I’m so excited to share these techniques that’ll make this delicious dish work perfectly with your busy lifestyle.
Proper Storage Methods
Once your gratin has cooled completely, gratin storage becomes super simple! Cover it tightly with plastic wrap or transfer individual portions to airtight containers.
Your gratin will stay fresh in the refrigerator for up to 4 days. This makes it perfect for meal prep or enjoying those amazing leftovers throughout the week!
Best Reheating Techniques
Reheating gratin properly brings back all that delicious flavor and texture! For individual portions, use your microwave with a damp paper towel cover. Heat in 30-second intervals until warmed through.
For the best results, I love using the oven at 350°F for 15-20 minutes. Cover with foil if it’s browning too quickly. The top gets beautifully crispy again!
Freezing and Thawing Guidelines
Freezing gratin is absolutely possible and such a lifesaver for busy weeks! It freezes beautifully for up to 3 months in portion-sized containers.
For thawing, move it to the refrigerator overnight, then reheat as usual. The texture might be slightly different, but it’s still absolutely delicious!
Make-Ahead Strategies
These make-ahead meals strategies will change your entertaining game! You can assemble the entire gratin up to 24 hours ahead. Just cover and refrigerate, then add 10 extra minutes to baking time.
Alternatively, prep all your vegetables and cheese sauce separately, then assemble when ready to bake. This approach is perfect for holiday entertaining when oven space is precious!
| Storage Method | Duration | Best For | Reheating Time |
|---|---|---|---|
| Refrigerator | 4 days | Weekly meal prep | 15-20 minutes |
| Freezer | 3 months | Long-term storage | Thaw overnight + 20 minutes |
| Make-ahead assembly | 24 hours | Party planning | Add 10 minutes to bake time |
| Component prep | 2 days | Flexible timing | Normal baking time |
Conclusion
This eggplant zucchini gratin recipe brings the heart of Mediterranean cooking right into your home kitchen. You’ve learned every technique needed to create layers of tender vegetables bathed in creamy, golden cheese sauce. The beauty of this comfort food lies in its simplicity – fresh ingredients transformed into something truly spectacular.
Your family will gather around the table as that incredible aroma fills your kitchen. Each bite delivers the perfect balance of Mediterranean flavors that make this dish so beloved. Whether you serve it as a stunning side or hearty main course, this gratin never fails to impress.
Start with the freshest eggplant and zucchini you can find. Follow each step we’ve covered together, from proper vegetable preparation to achieving that perfect golden top. Trust the process – you have everything you need to create restaurant-quality results at home.
Your gratin will become a cherished recipe that brings people together. Share it at dinner parties, family gatherings, or quiet weeknight meals. This is comfort food at its finest – nourishing, satisfying, and absolutely delicious. Get ready to create something beautiful!
🍆 Love eggplant? Explore more dishes in our roundup: 15 Delicious Eggplant Recipes You Need to Try